Goat Hay Feeder Project
Today we started our new goat hay feeder and it went a lot better than I thought it would. We only ran into a few little problems but in all they didn't take long to find solutions too. I am going to be so happy when we get a chance to move the feeder into the barn later this week. Its going to be a huge difference! We have been looking at a ton of other ideas for feeders and non of them really worked for us so we took the base idea and changed it to what would suit us. Hope this might help a few other DIYers out there. If you have any questions please feel free to e mail me. I'm sure I forgot something while writing this down, I was the assistant after all.
Materials List
1 16 foot hog panel (only need 8 feet)
11 2x4 8 foot
2 treated 2x4 8 foot (for the legs)
1 4x8 sheet 7/16 inch OSB (waffer board/plywood)
1 5 pound box of 3 inch screws
1 small box of 1 and 1/2 inch screws (you wont use them all)
3 1 inch long U bolts with washers and nuts to fit
Tools
screw gun
drill
jig saw
circular saw
level
assorted drill bits
a quick square (I don't know what this tool is really called)
Grinder (to cut off uneven edges of your panel)
Safety goggles (safety first ;)
This is a picture of the finished hay feeder its 8 feet long by 3 feet wide
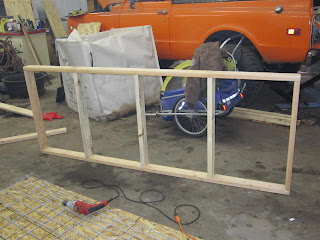
The start of the feeder: 2 2x4s 8 feet long and 5 cross pieces that are 32 inches long all screwed together
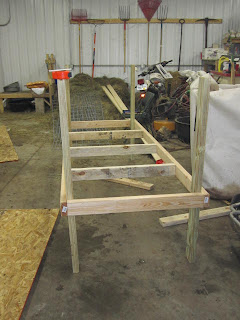
Here are the legs added on; they are 4 2x4s cut to 4 feet. Then we measured up 17 inches from the floor to the bottom part of the frame.(its 20 inches to the top of the 2x4 and 17 on the bottom of the 2x4) That is where we marked and attached the frame to the legs of the feeder. Making sure the legs were level the whole time. Depending on the breed of goat you might want to make the legs longer or shorter. We just had to make sure that the legs were 4 feet since the feeder is going to act as the back of a kidding stall.
We then measured out a piece of plywood 3x8 feet and cut holes for the legs to go though a half inch bigger than the actual size of the leg. The exact measurement was 1 and a 1/4 in measured the short end of the plywood and for the right hand side was 1 and a 1/4 measured from the long side of the plywood piece.The left hand side was 3 and a 1/4 measured from the outside long edge of the plywood piece and the top part of the rectangle was 5 and a 1/4 inches measured from the short bottom piece of the plywood. I think that makes sense. Mind you Tom is the builder not a writer so I am trying to interpret his directions so other people can understand. Basically make holes on all 4 corners so that the legs can slip through. You could just cut the whole corner off but Tom likes to make things exactly the way he wants them.
We then slipped the plywood over the legs. It went on pretty easy with a little wiggling. He also added some supports (which you can't see) cut at 45 degree angel that are 24 inches from long end to long end on the bottom part of all 4 legs so that the feeder would be even more stable. This is up to you, Tom overbuilds everything that he makes adding extra braces and supports even when it most likely would be ok with out them. Just use your own discretion :)
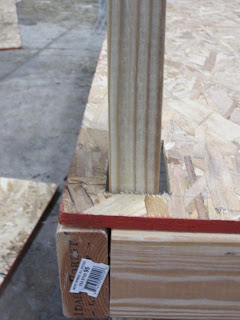
This is a close up of how the deck fits over the leg; you can see Tom left a little space for some wiggle room to get the legs through the decking.
Here Tom attached the 7ft 8in 2x4 that is going to act to hold the piece of hog panel in place. Center it. We had to do some dinking around at this point so bear with me.
To make cleaning of the feeder easier we attached the panel with U bolts that we stuck through the plywood spread out across the hog panel in 3 places. (This will allow us to tip the hog panel up so that I can clean off the left over hay when it builds up.) Along with 2 screws that are acting to basically hold the panel 10 inches from the back of the feeder so that we could attach the u bolts. Ok that's how the hog panel is attached to the base of the feeder. Then we took the left over piece of plywood from the deck of the feeder and attached it to the back of the feeder so that the hay will not just fall out. (I'm thinking we are going to have to angle it later on but for now its staying like this) We also ran a 2x4 across the front top of the feeder to make the hog panel more stable. (it was wiggling in the middle too much) Tom then took two chunks of 2x4 (if you look by the top left of the feeder where the hog panel leans up you can see the little block of wood) and screwed them in so that the hog panel doesn't just flip up if the goats push on it. Just unscrew them and you can flip the panel back up. Were going to get a latch that we can just unhook the panel but for now this is going to have to work. So if you can figure out a better locking system go for it :)
Then on the front bottom to stop the goat kids from slipping under the feeder Tom attached 2x4s across the bottom with 4 in spaces between them. (You don't have to do this but the feeder is going to act like a wall for us so we don't want goats getting around it) But the 2x4s are going to act kinda like a ladder too for the little kids, so you might want to add one just to make it easier for your goats to step up. He also took a piece of plywood and stuck it on the left and right ends to keep the hay from slipping out.
He also added a left over piece of cut down 2x4 to the front of the middle 2x4 to make a little ledge so that the kids can step up on that to get into the feeder a little easier. He also put a 2x4 across the front of the deck of the feeder to catch the hay so it doesn't just fall on to the floor when the goats pull it out of the wire of the feeder. I will add another final picture of the feeder once we get it moved into the goat barn. To show how the hay looks once its in the feeder. Also to show how the goats eat out of the feeder. If you have any questions please ask.


No comments:
Post a Comment