Friday, February 10, 2012

Goat Feeding Area


 Goat Feeding Area
It has taken us years of having goats to figure out exactly what we needed to have the perfect feeding area. Along with the goats we also have a llama so we had to make the feeders extra high so that he could not get over them and into the grain storage cans.
 This feeder is the one closest to the garage door. As you can see Tom built the feeder into the wall so that the llama can not hop up and over the feeder. Or have the goats get over them either (don't think they could but you never know)
 Here is the view you have when you first walk into the barn area from the shop. I can stuff the hay into the feeders with out tripping over the goats. Which was always one of my biggest problems, or having the goats push their way into the shop as I was walking in with my hands full of hay. 
 Here is the door into the goat area. We just took two pieces of left over hog panel and flipped them so that the smaller holes were both towards the bottom to keep the kids from getting stuck. Then we attached them with bunch of zip ties. Tom then made 3 wooden hinges to attach the gate to the wall. I wasn't sure about it but it has been working wonderful.
 Here is my work counter above my grain storage cans. I have only used it two times since its been all finished but let me tell you having the bowls all spread out is a whole lot easier than having them on the ground. Much less of a mess and easier on my back. 
 Just a cute picture of our puppy Lucy meeting all the barn animals. A good way for her to meet them with out having to worry about the attack llama doing his job. Let me tell you he was watching her like a hawk though.
 Heres a picture from the goat area, you can see where the two walls connect in the corner. One feeder on each wall so that the goats can all eat at the same time and have plenty of room.
 I think we are going to put a mineral block holder on the open spot between the door and the corner. Its not good to waste space so we have to use all we have.
 A nice view of the feeder that is connected to the wall. this one was 9 feet long and has a bar so that the kids can jump up and get the hay pulled out. Still might have to put a couple of cinder blocks down to make easier for the little kids.
 Hay on the left grain storage on the right
 More grain storage pictures but with the barn cat Bud
Final picture of the exit door to the outside. This allows me to sweep out the feeding area with out having to sweep into the goat area.
When we built the barn/shop this was why we had this service door installed right next to the garage door. (our building designer thought we were nuts having two doors 3 feet apart) Now I am so happy that we stuck to our guns and had the service door put in.

Saturday, February 4, 2012

Goat Hay Feeder

Goat Hay Feeder Project
Today we started our new goat hay feeder and it went a lot better than I thought it would. We only ran into a few little problems but in all they didn't take long to find solutions too. I am going to be so happy when we get a chance to move the feeder into the barn later this week. Its going to be a huge difference! We have been looking at a ton of other ideas for feeders and non of them really worked for us so we took the base idea and changed it to what would suit us.  Hope this might help a few other DIYers out there. If you have any questions please feel free to e mail me. I'm sure I forgot something while writing this down, I was the assistant after all. 
Materials List
1 16 foot hog panel (only need 8 feet)
11 2x4 8 foot
2 treated 2x4 8 foot (for the legs)
1 4x8 sheet 7/16 inch OSB (waffer board/plywood)
1 5 pound box of 3 inch screws
1 small box of 1 and 1/2 inch screws (you wont use them all)
3 1 inch long U bolts with washers and nuts to fit
Tools
screw gun
drill
jig saw
circular saw
level
assorted drill bits
a quick square (I don't know what this tool is really called)
Grinder (to cut off uneven edges of your panel)
Safety goggles (safety first ;) 
This is a picture of the finished hay feeder its 8 feet long by 3 feet wide 

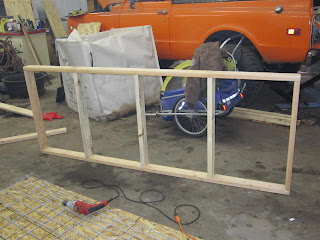
 The start of the feeder: 2  2x4s 8 feet long and 5 cross pieces that are 32 inches long all screwed together 
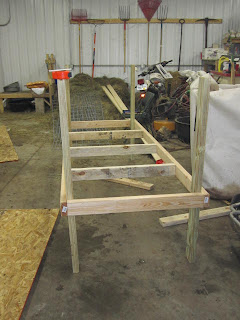
 Here are the legs added on; they are 4  2x4s cut to 4 feet. Then we measured up 17 inches from the floor to the bottom part of the frame.(its 20 inches to the top of the 2x4 and 17 on the bottom of the 2x4) That is where we marked and attached the frame to the legs of the feeder. Making sure the legs were level the whole time. Depending on the breed of goat you might want to make the legs longer or shorter. We just had to make sure that the legs were 4 feet since the feeder is going to act as the back of a kidding stall.
 We then measured out a piece of plywood 3x8 feet and cut holes for the legs to go though a half inch bigger than the actual size of the leg. The exact measurement was 1 and a 1/4 in  measured the short end of the plywood and for the right hand side was 1 and a 1/4 measured from the  long side of the plywood piece.The left hand side was 3 and a 1/4 measured from the outside long edge of the plywood piece and the top part of the rectangle was 5 and a 1/4 inches measured from the short bottom piece of the plywood. I think that makes sense. Mind you Tom is the builder not a writer so I am trying to interpret his directions so other people can understand. Basically make holes on all 4 corners so that the legs can slip through. You could just cut the whole corner off but Tom likes to make things exactly the way he wants them.
 We then slipped the plywood over the legs. It went on pretty easy with a little wiggling. He also added some supports (which you can't see) cut at 45 degree angel that are 24 inches from long end to long end on the bottom part of all 4 legs so that the feeder would be even more stable. This is up to you, Tom overbuilds everything that he makes adding extra braces and supports even when it most likely would be ok with out them. Just use your own discretion :)
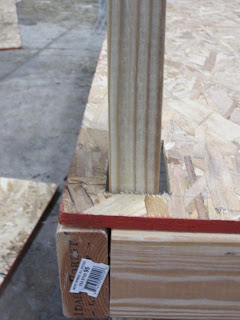
 This is a close up of how the deck fits over the leg; you can see Tom left a little space for some wiggle room to get the legs through the decking.
 Here Tom attached the 7ft 8in 2x4 that is going to act to hold the piece of hog panel in place. Center it. We had to do some dinking around at this point so bear with me. 
 To make cleaning of the feeder easier we attached the panel with U bolts that we stuck through the plywood spread out across the hog panel in 3 places. (This will allow us to tip the hog panel up so that I can clean off the left over hay when it builds up.) Along with 2 screws that are acting to basically hold the panel 10 inches from the back of the feeder so that we could attach the u bolts. Ok that's how the hog panel is attached to the base of the feeder. Then we took the left over piece of plywood from the deck of the feeder and attached it to the back of the feeder so that the hay will not just fall out. (I'm thinking we are going to have to angle it later on but for now its staying like this) We also ran a 2x4 across the front top of the feeder to make the hog panel more stable. (it was wiggling in the middle too much) Tom then took two chunks of 2x4 (if you look by the top left of the feeder where the hog panel leans up you can see the little block of wood) and screwed them in so that the hog panel doesn't just flip up if the goats push on it. Just unscrew them and you can flip the panel back up. Were going to get a latch that we can just unhook the panel but for now this is going to have to work. So if you can figure out a better locking system go for it :)
 Then on the front bottom to stop the goat kids from slipping under the feeder Tom attached 2x4s across the bottom with 4 in spaces between them. (You don't have to do this but the feeder is going to act like a wall for us so we don't want goats getting around it) But the 2x4s are going to act kinda like a ladder too for the little kids, so you might want to add one just to make it easier for your goats to step up. He also took a piece of plywood and stuck it on the left and right ends to keep the hay from slipping out.
He also added a  left over piece of cut down 2x4 to the front of the middle 2x4 to make a little ledge so that the kids can step up on that to get into the feeder a little easier. He also put a 2x4 across the front of the deck of the feeder to catch the hay so it doesn't just fall on to the floor when the goats pull it out of the wire of the feeder. I will add another final picture of the feeder once we get it moved into the goat barn. To show how the hay looks once its in the feeder. Also to show how the goats eat out of the feeder. If you have any questions please ask.

Thursday, February 2, 2012

Our Wood Stove; The Best Thing Since Sliced Bread

Our wood stove has proven to be the best thing that we have ever purchased. Not only have we used under 5% of our LP tank this winter (we usually have been filled up once and are getting ready to be filled up again in March) We haven't even turned on our furnace, now that's something!

 The picture above is just after we finished doing the final sealing of the natural slate tile. Tom built the elevated platform that we laid the cement board on and then we laid the tile. I grouted the tile which was probably the easiest project I have ever had. Totally impressing Tom when he got home from a long day at work. I will say cutting the tile was a pain in the butt and it would have been a heck of a lot easier using a wet saw, not a normal stone cutting dremel tool. Lesson learned I guess.

 This was taken a few weeks ago, the dogs love laying on the warm tile watching the flames flicker. Its also a favorite spot to leave our shoes and boots. Its so nice sliding your feet into nice toasty boots before going out to the barn in the morning to do chores. 
 Elwood was getting a little annoyed with me in this picture, he likes to wake up and sit on the warm tile when he comes out into the living room. (usually he sits with one of the dogs on their dog bed by the wood stove but this day he was trying to watch cartoons. Not at all impressed by his mother standing in front of him with the camera.) 
I think that the wood stove has been a great addition to the family, not only does it provide enough heat for our little over 2000 square foot house but its has made our whole family closer. We spend more time together out in the living room playing games, watching movies, reading books and frankly enjoying the heat the wood stove pumps out. We also spend more time together outdoors cutting, chopping and stacking firewood during the  summer months. The exercise has been great! I'm not always happy about doing it at the time but when its over I sure feel good about myself. It also makes me feel good that Tom and I are providing our own source of heat for our family. Sure its not as easy as setting the thermostat to 70 and sitting back but man alive I don't think we will ever go back to that. I almost feel guilty even thinking about it. But it is nice to know its there. Even if we aren't using it.

Wednesday, February 1, 2012

My Winter Project, Baby and Kid Hats

Being stuck in the house all winter always proves to be quite an interesting experience. I am always looking for something to keep me busy and having both boys gone at school for half a day has made having projects even more important. This winter I have retaught myself how to knit and this has expanded in to making hats for my sons, nephews and of course friends children. Well I have provided hats to all of the kids I personally know so now I am starting to make hats as part of my home made and hand made business Wild Geranium Hollow Farm. Here are a few pictures of the hats that I have on hand. Well the pictures that Elwood would allow me to take. He was more interested in getting pictures of Lucy and him than he was of making the hat look nice. I am going to work on getting the boys to show off the hats a little more when they are willing models.
 The hats are made out of anything you would like from 100% organic wool to alpaca and the price will reflect that quality. All you need to do is tell me what color you are looking for and what you would like the hat made out of. I can find basically anything that you could want. (well within reason) Before I make the hat I will tell you the price of the wool and then I add $25 for me to knit the hat. Shipping is always extra but the hats are light as a feather so that is never much.


  If you are interested in ordering a hat or have any questions about the hats please feel free to check out my website: www.wildgeraniumhollowfarm.com  If you look for the baby and child hats page there is a contact form. I love questions and love to hear feedback from everyone.

Tuesday, January 31, 2012

Birdhouses in Winter


 I decided to take a little walk this morning since it was so beautiful outside, yeah 31 degrees is beautiful in Wisconsin on the last day of January. As I was walking around I decided to take a few pictures to show how my birdhouses are doing throughout the winter weather. Here is one of my gargoyle houses that still has the house wren nest in its mouth.
 This little goober was the home for a tree frog all summer. I wish I had taken a picture of him (or her) sitting looking out the mouth of the birdhouse. One day while I was walking down the fence line I could swear I heard a baby bird crying out for help, so I spent a good hour going threw the grapevines below the birdhouse looking for the "baby bird"  Then I looked up and it was a little tree frog peeping away from inside the mouth. I was relieved, the cats out "helping" me look for the baby bird were not as excited as I was.
This cute little wren house was totally surrounded by grapes this summer. As you can see the leaves are all off and you can still see the vines growing up and around the bird house. I can't wait till spring comes again and the grapes come back to life. I will upload some pictures of our grapes that I took last summer, they really make the birdhouses look even better. These look so cold and sad.

Sunday, January 29, 2012

New addition to the farm

I figured this would be an appropriate first post to our new farm blog since its a new beginning for Lucy!

Meet Lucy the newest addition on the farm. We adopted her from the Adams County Animal Shelter. She is a English Fox Hound. She has proved to be a wonderful addition to the family. Having never had a dog of the hound variety I'm sure that this is going to be a learning experience. She already follows her nose before anything else. She gets along great with Sheldon our lab, they wrestle around which has been giving Hemi our little 5 lb miniature rat terrier a well deserved break. I can't wait to see how she is going to react to the goats. Right now there is far to much snow to get her down to the fence line. She is happy just to run around on the plowed trails that Tommy has made for her with the tractor. One spoiled little girl! Daddies little angel already.

I took Lucy down to the chicken coop with me for the first time last night and she was not too sure about them. I'm sure she will get used them, but the second the guinea hens started calling she tucked her tail and ran.